Thursday, May 14, 2020

Cloth Mask with Adjustable Ties

Cloth Mask with Adjustable Ties, by Caitlyn


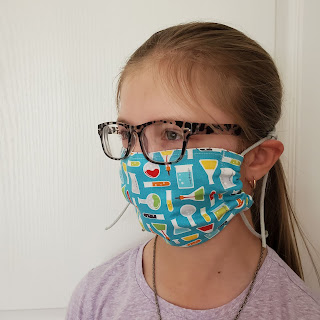
person wearing cloth mask with ties made of nylon cord
This is my Think Like an Engineer Take Action project. I knew that my Take Action project should be to something to do with masks because I am helping my mom make masks for people in the community who need them.  Sometimes masks don’t fit properly, because they’re too small or too big, and I wanted to make a mask that would fit everybody so they could get maximum protection from the mask.  So I thought, “What if you could cinch it on the sides so that it would fit each person perfectly?”  I was inspired by my friend who made me an adjustable bracelet with a sliding knot to fit my wrist.   Safety note: this mask is not for young children, but for people age 8 and up.  Children wearing masks should always have close adult supervision. 


Materials:
Adult size mask
3 pieces of woven cotton 7” x 12”
2 pieces of paracord, 36” each

Youth size mask
3 pieces of woven cotton 6” x 10”
2 pieces of paracord, 30” each

Tools:
Sewing machine
thread
scissors
pins
safety pin

Directions:
1. Place fabric rectangles in a stack with the top one printed side down.  

2. Sew the 3 layers together along both long edges with ¼” seam.  Turn right side out.  Press.  Topstitch around the entire perimeter of the mask, ¼” away from the edges, backstitching at the beginning and end. 


3. Fold short edges 1” toward the back side of the mask, pin in place.  Zig-zag stitch between the line of stitches and the raw edge, backstitching at the beginning and the end.  


4. Use a safety pin to thread paracord through the pockets on each side.


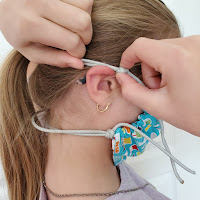
5. Tie 2 sliding knots connecting the top ties.  Then repeat with the bottom ties.  Adjust the placement of your knots, to customize the fit of your mask. 
hands showing how to tie a sliding knot


6.  Place the bottom tie behind your neck, then the top ties above your ears.  Slide the knots to adjust the fit of your mask.  The sides of the mask fabric should be gathered, and close to your cheeks for a good fit.  You can cut the excess paracord if desired.  Heat seal the ends to prevent fraying.
hands demonstrating how to adjust nylon tiesside view of person wearing cloth mask gathered at sides on adjustable nylon cord

Friday, November 3, 2017

Kids Quilt Round Robin

This summer, my daughter Caitlyn participated in the #kidsquiltroundrobin hosted by Sarah of Berry Barn Designs and Sarah of Sarah Goer Quilts.


Each group of four kids took turns making quilt blocks for each other.  Caitlyn's group included G from Sarah Goer Quilts, H from Orange Room Quilts, and Sophie from The Felted Pear

Caitlyn chose the four-row format for her quilt, with a design theme of Hearts and Stars in pink, yellow, teal, blue, and white.


In May, she made the first row for her own quilt, and sent it off in the mail with her KQRR info sheet.


In June, I designed and Caitlyn stitched a football for G who requested a 20" block and sports theme.  The laces of the football were foundation paper pieced.  This was the first time she had sewn curves.  


In July, Caitlyn sewed this colorful 20" block for H, who requested rainbows and brown.  I'm pretty sure this block exhausted my stash of brown fabrics!


August was the final month for Sophie, who requested a 20" block of rainbow stars.  This pattern is Confetti Star by Amy Friend of During Quiet Time, available on Craftsy.


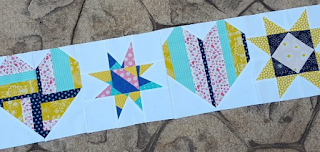
September saw the return of four beautiful Stars and Hearts rows from our new friends:


Oh, how happy and excited Caitlyn was to see these rows all together!  Folks, keep in mind that the kids sewing these rows are ages 5 - 9 !!!!  With super-supportive and awesome quilty moms, of course.  I am so proud of the work these kids have done for each other. 

Caitlyn wanted her quilt to be big enough to sleep under, so four 10" x 40" rows wasn't quite big enough to suit her.  We pulled additional fat quarters from my fabric stash to coordinate with her chosen color scheme.  White, yellow, pink, teal, blue: five fat quarters of each color, and then she laid them out on the floor.

We sort-of-improvisationally came up with a plan for sashing and bordering that wouldn't be too much additional piecing, but still coordinate with the overall scrappy look of the four rows.  Caitlyn decided the arrangement of colors in the sashing rows would be lightest to darkest from top to bottom and she helped to figure out the quilt math, using a caculator to figure that 40 inches divided by 5 fabrics equals 8 inches.  I helped her remember to add the seam allowance before cutting.  She is not quite ready to use a rotary cutter independently, but she did practice by cutting all of the sashing pieces herself.  The height of each sashing row was decided improvisationally: she wanted the rows to be spaced exactly as they are in this photo below where you can see the arrangement of the folded fat quarters.  She lay down beside it to test the length!


After all those pieces were cut, she referred back to the photo above for the layout, and moved her sewing machine to be closer to the design floor while she stitched them all together.  It's a pretty comfy set-up, don't you think? 


This quilt has been adorning the floor for several weeks now, while Caitlyn makes slow and steady progress finishing the piecing.  It's almost done!  She just needs to attach the right side border. 


Caitlyn chose backing and binding fabrics from our favorite local quilt shop a few weeks ago, so after the piecing is finished, she will be ready to baste and quilt it.  Her plan is to finish in time to submit it to the Youth category for QuiltCon 2018. 

Thank you so much to Sarah and Sarah for imagining and hosting this fun Round Robin for our kids!

You can check out the other KQRR projects at the following links:

G & R of SarahGoerQuilts.com @sarahgoerquilts

Z of AStrangerView.com @astrangerview
Sophie of @thefeltedpear

Find me on Instagram at @tiffanybaxter.

From time to time, I practice quilt design with the Quilt Design A Day Facebook Group.

Saturday, June 14, 2014

Link to Flickr

Find me on Flickr:
Or Instagram: @tiffanybaxter

Friday, April 20, 2012

Amy's Gardening Gloves

I finished piecing these amazingly cute Gardening Gloves a couple of nights ago, but I've been waiting for the rain to clear up so I could take a picture.

Gardening Gloves by Amy of During Quiet Time

And the picture needs some white balance--that background is Kona white!  but appears very blue here. 

The other fabrics are Oz Dizzy Floral by Sanae for moda, Dimples by Gail Kessler for Andover, and the pinstripe is from Punctuation by American Jane for moda.

You can find this pattern at Amy's Etsy shop.  Oh, and go visit her blog at During Quiet Time,  she makes some really awesome stuff. 

Sunday, April 15, 2012

Watering Can

Watering Can, design by During Quiet Time


Yesterday, I was the lucky recipient of a giveaway from Amy @ During Quiet Time.  She offered up her beautiful set of garden themed paper pieced patterns.  I had my eye on these, and was waiting to buy them until after I had cleared a few items from my WIP list.  But I was so excited to receive them, that I dove right in last night and finished the watering can.  I love the skinny handle! 

Thank you so much, Amy!

During Quiet Time patterns are available here.

Saturday, April 14, 2012

Yay!

Today I won a giveaway from Amy at During Quiet Time.

A set of her garden themed paper piecing blocks!   Aren't they beautiful?  I can't wait to start working on these, but first I have to do some real gardening outdoors today.  Spring cleanup:  pulling weeds, raking leaves, and spreading fresh mulch.

Thanks so much to Amy for these beautiful patterns!  Click on the image below for a link to her etsy shop. 

https://blogger.googleusercontent.com/img/b/R29vZ2xl/AVvXsEgps0-Pdi8bsKIYEL9wC7xA8rFd6ti2vX-PTACMHgKUO_olQGRQASt17Gnv8N6FZnzqhRmZMm3qctVf7XGan2FwK2RCP0zF-peN8vEMa-KcLHyUG-OWLMgDwagQ5OuEXDT9IKdu3yp7azfG/s1600/mosaicb90dba81bc35d50f107e112868bcbc2e7b2ba107.jpg
During Quiet Time Paper Pieced Patterns